
Contents
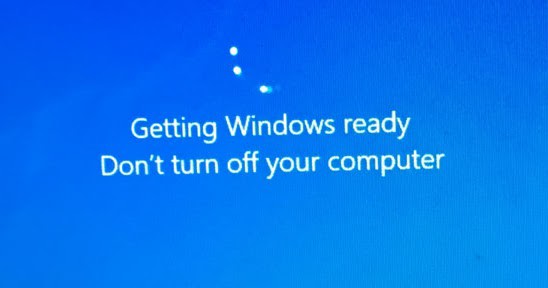
Many Windows 10 or 8 users have a problem with their operating system. They often get stuck on the loading screen, “Getting Windows ready. Don’t turn off your computer. “The problem is the issue comes up when they try to turn the computer on, off or restart. Hence, users are not able to navigate beyond this screen by restarting their computer.
This is a widespread problem reported by uses when they try to update windows on their computer. This could be due to many reasons involving corrupted update files, PC turning off in between while installing updates. Driver conflicts etc. To fix the problem you have to try these solutions, don’t worry.
You don’t have to try everything; Scroll down the list until you find something that works for you.
PC Stuck on “Getting Windows Ready”
#1: Wait for some really long time
When your computer displays the “Getting Windows ready” screen, in the background, it may be downloading or installing system files or performing some tasks. Your system may take some time to complete these tasks. So, in order for your system to boot normally, you have to wait until the whole process finishes. After the procedure is finished, you will exit from the screen.
If you wait for a reasonable time, let’s say about 2-3 hours, and still, it’s on the same window, then move on to the next step.
#2: Power reset your computer
A power reset can erase all data in computer memory without destroying your data. This will help you to fix the corruption issues in your computer and get you out from the “Getting Windows ready” loop.
In order to power reset your computer, follow these steps:
- Turn off your computer.
- Unplug all peripherals (USB flash drive, external hard drive, headphones, etc.) from your computer.
- Unplug the power cable from your computer.
- Remove the plug of your battery from the battery compartment of your laptop (you can remove your laptop battery only if you are using a laptop).
- Hold down the power button on your computer for 30 seconds. (Your computer should stay off afterwards.)
- Add Plug the power cable (and the battery) back into your computer.
- Turn on your computer. Now check is this process works for you, Then you will no longer see the screen.
#3: Run System File Checker
For Windows users to scan and recover corrupted system files the System File Checker Utility is a Windows built-in tool. If you are not able to resolve it “Getting Windows ready” screen, you probably have some corrupted files on your computer. You should also try running a system file checker to see if it can fix these corruption issues.
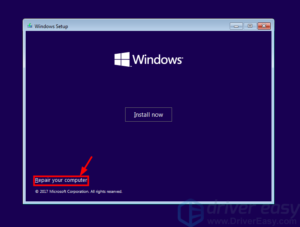
Note: Your system requires Windows installation media (USB installation drive or installation DVD) before performing the steps below.
- Firstly, For Booting, please plug your Windows installation media into your computer.

- Choose your language and location. Click Next.

- Click Repair your computer.
- Select Troubleshoot.
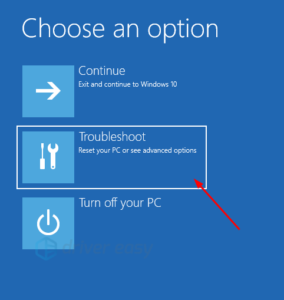
- Select on command prompt.

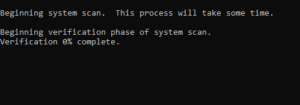
- Click Enter on the keyboard after Typing “SFC / scan now” in command prompt.
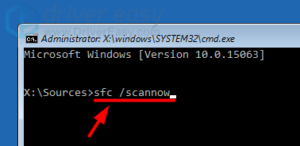
- Wait for the process to complete.
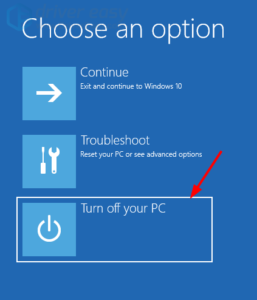
- Close the command prompt—select Turn off your PC.
- Turn on your computer. Check if the error does not appear.
#4: Reinstall your windows.
After trying all the above methods and if none of the above methods works for you, your system may have some unresolved issues. At this Movement, you have to reinstall your Windows system. To do so, you can add your Windows installation media to your computer and follow the on-screen instructions to reinstall the windows in your system. Then you can check if the problem is fixes. (Note that this will delete your data on the partition inserted by your operating system.)
The method mentioned above should help you in getting rid of “Getting Windows Ready” problem. If you have any suggestions, please let us know by Commenting below which way worked for you.


![[pii_email_037d07812f905a3927ae]: solved error of Permission Denied (Publickey)](https://techransom.com/wp-content/uploads/2021/12/pii_email_037d07812f905a3927ae-150x150.jpg)